Like A Moth To A Flame: Making Pigment Transfer Prints
.jpg)
Assortment of my pigment transfer prints
For better or worse, I am a bit of a moth to a flame when it comes to exploring unusual and complex processes. It’s just in my nature. I am lured by thoughts such as, “I must find a way to do that!” and “That would be so cool!”.
The upside is that it is fun, exciting, and gets my mind racing with possibilities.
The downside is explaining my process to others in a clear and concise way, whether that be in a conversation, or even when I need to whittle it down for that ever-so-small exhibition tag: Egads! Did I choose the right words? There's so much I had to leave out!
Well, this blog post is coming to the rescue! It's the perfect place to demystify the pigment transfer print process.
STANDING AT THE CROSSROADS: Giclee Prints vs Pigment Transfer Prints
First a little history as to why I chose this process in the first place.
As with all digital art, one must decide what form the final image will take. Will it remain in a pixel state and be displayed on a screen? Or will giclees (aka quality inkjet prints) be made? What about the various transfer processes out there? And on what surface will the final image rest? Paper? Canvas? Metal? Glass?
The choices these days are abundant. It's enough to make your head spin!
Needless to say, I struggled immensely with this decision when I first began creating my mixed media digital collages.
Though I had already been experimenting with pigment transfer printing after discovering it in Bonny Pierce Lhotka’s book, “Digital Alchemy”, I nonetheless thought it would be nuts to offer multiple prints this way, since it is a rather time-consuming process. Plus, I wasn’t sure how they would be received in the art world.
For a time, my practical self insisted that giclee prints were the smarter way to go. A voice inside said, “Why do you always have to complicate things? Just push a button and be done with it!”. To which I responded, "Guilty, as charged." and "Yeah, that sounds easy. I like it."
Still, every time I’d finish one of my digital collages, I'd disregard this voice and do a pigment transfer anyway. I couldn't wait to see how the image would transform through this magical process.
I told myself I was just doing these for fun and any further prints would be giclee. It would be crazy to do otherwise.
CALL ME CRAZY
Needless to say, I changed my mind.
Why? ...I'd say it was a cross between the positive feedback I was getting about the transfer prints and an intuitive tug.
The reaction to the prints was undeniable. People were loving the beautiful surface quality and were full of questions about the process.
I also realized it was viscerally more satisfying to physically engage in the making of the print. Plus having a degree of variability between prints was exciting too.
Direct giclee printing now seemed cold and removed in comparison (not to disparage that technology since getting good results takes a ton of know-how and is an art in and of itself).
It seemed fitting too, that since my digital collages are created from hand-drawn elements, their rebirth into the physical world should be a hands-on process.
THE HOW
Now that you know the backstory, here’s a quick tour of how it is done...
First, digital file preparation is key with a whole host of settings that affect color, size, and quality. Once those are determined, the image is printed onto a clear film which is specially coated for the transfer process. I use a professional Epson 3800 inkjet printer with archival quality pigment inks to ensure long-lasting and rich color.
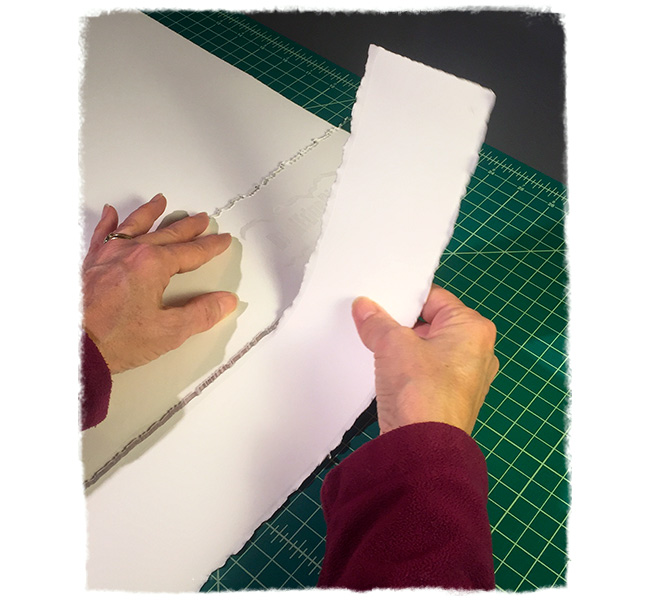
Deckling paper edges
I then prepare the paper by trimming it to size and "deckling" the edges for a torn appearance. Not only does this look lend itself to my images which are full of textural and raw marks, but it further engages me in the making of the physical print. I use Arches 88, a 100% cotton rag paper that absorbs the pigment inks nicely.
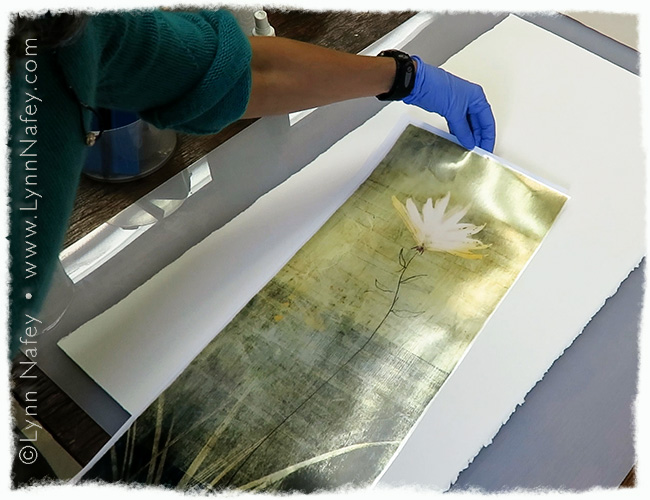
Paper and printed carrier film are ready to go!
Before beginning the transfer process, I thoroughly clean my working surface and gather all the needed materials.
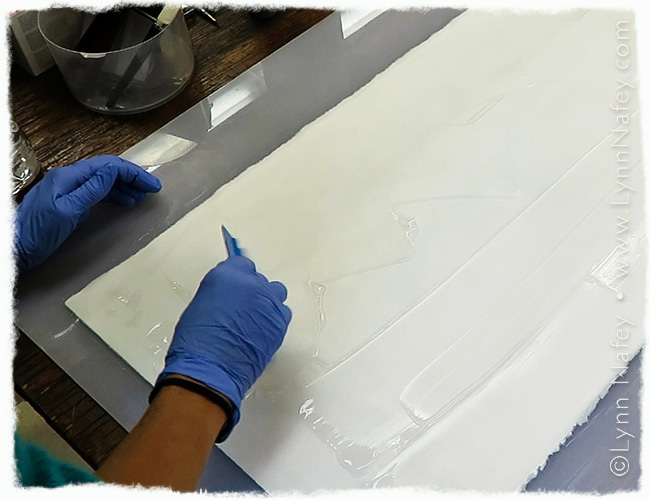
Applying the alcohol gel
Next, an alcohol gel is applied to the paper. This acts as a solvent to dissolve the inks on the carrier film so they can be absorbed into the paper. Patience and experience pay off in getting an evenly soaked surface with just the right amount of solvent. Too little and the image will not transfer well and too much may cause the image to smear.
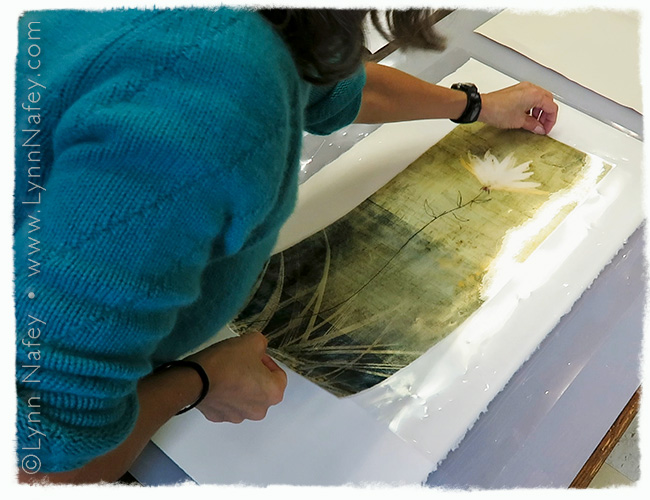
Aligning the printed carrier sheet
Once the paper is properly wetted, I carefully center and place the film.
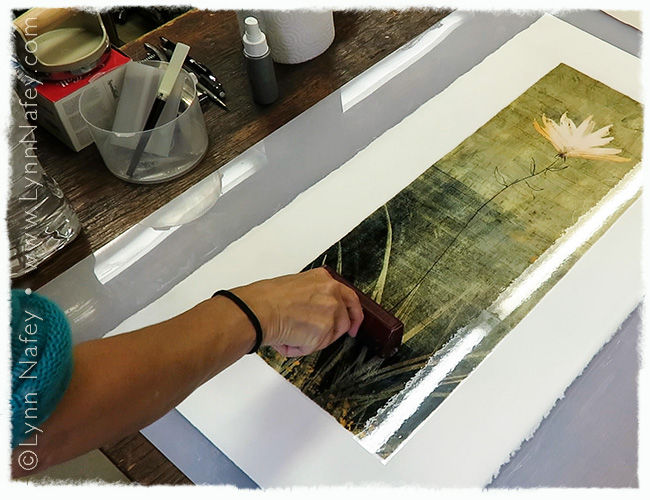
Using a brayer to press the image onto the soaked paper
To get good contact, I gently use a brayer to press the inks into the paper.
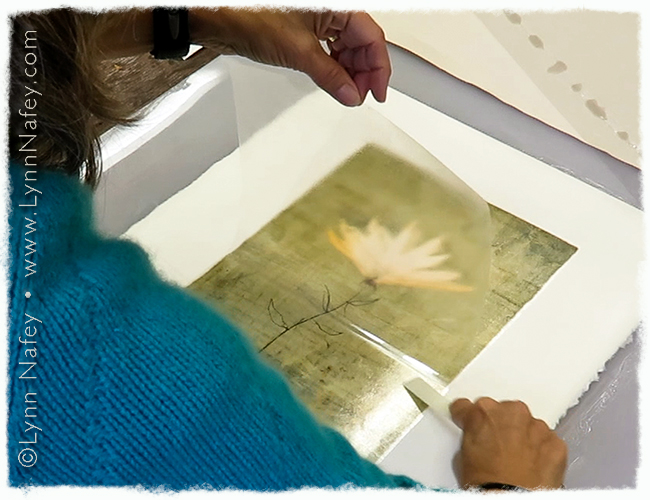
Lifting the film to reveal the transferred pigment print
Finally, it is time for the magic as I lift the film to reveal the transfer-printed image. I love the subtle, and sometimes not so subtle, variations that give each print its own uniqueness.
I always breathe a sigh of relief at this point (if all has gone well). Though a relatively simple process in concept, things can, and do, go wrong. It took many hours of experimentation to find my way with the process and master it enough to get consistent results.
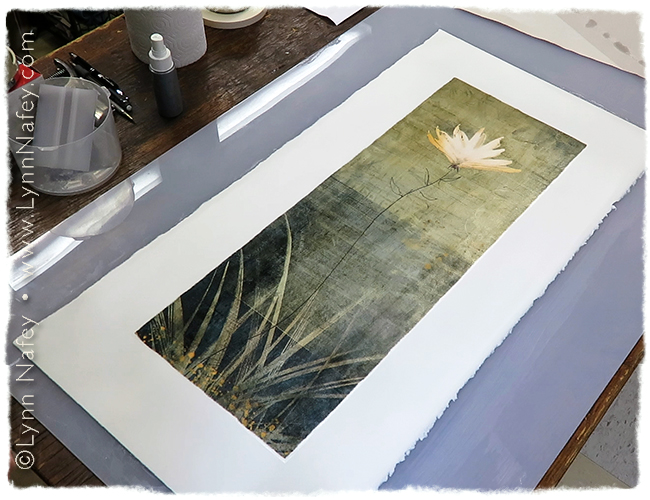
Voila! The finished pigment transfer print of "Rising".
A PERFECT MARRIAGE
Looking back at my crossroads moment, I’m glad I decided to follow my passion and create my limited edition prints using this exciting pigment transfer process. I see now how well it marries with the rich colors and synergistic textural marks of my mixed media digital collages.
Since I have started exhibiting these, I’m slowly getting better at distilling down the process in my conversations with others. Plus, now I can steer anyone I may have hopelessly confused to this blog post.
To see or purchase my limited edition pigment transfer prints: Visit my online shop


Comments
Penny
Hey, that looks amazing!
William Butterick
Hi Lyn, love your piece about the pigment transfer process and really want to try it myself. Just have a couple of questions - what type of coated film paper do you use and what alcohol gel is best for transferring? All the best, will
Anonymous
Great looking results! Do you use DASS paper to run through the inkjet printer? Have you found anything cheaper? Thanks!
Lynn Nafey
Thanks! I love DASS film, so I have not searched for anything cheaper.
Anonymous
Please can you share what paper/gel you've used! Thank you
Lynn Nafey
I learned about this process through Bonny Lhotka's books. She has a video that will give you all the details you need: https://vimeo.com/dassart
Post new comment